
Thank you for visiting!
Check out some fun ideas from FamilyFun magazine for the kids to make homemade Mother’s Day gifts!

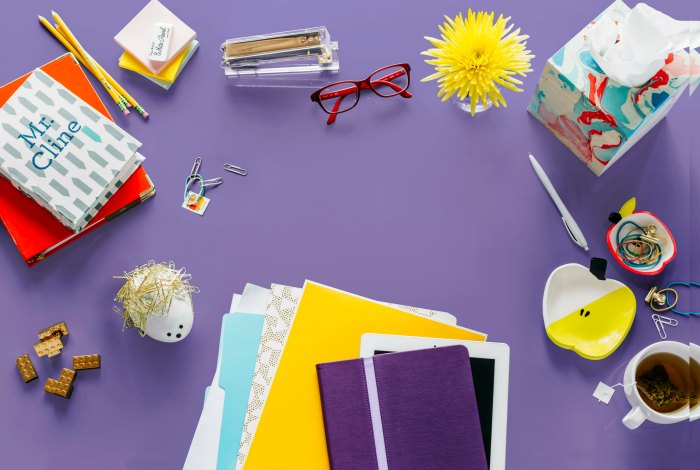
MOD APPLE DISH
- Cover the surface of your workspace with wax or parchment paper.
- Pull off a ball of white air-dry clay about the size of your apple cookie cutter. Use a rolling pin to roll it out to about ¼-inch thickness.
- Cut out the apple shape and remove the excess clay. Holding the cutout in your palm, gently pinch the clay upward and outward; start in the middle and work toward the edges to curve it into a shallow bowl shape. Once you’re done, set it into the cookie cutter to dry (that will hold the edges up) at least 24 hours or according to package instructions.
- Use a paint pen or craft paint and paintbrush to draw on the seeds, stem, leaf, and any other decorations. For the dipped effect, apply a strip of washi tape before you paint so you get a clean line. Let the paint dry.
- Varnish the dish with air-dry gloss (like Sculpey Gloss Glaze, $6; michaels.com), following package directions.

FABRIC-COVERED BOOK BOX
- Paint the “pages” of a papier-mâché book box (find them at craft stores) with white craft paint; let dry.
- Cut a rectangle of fabric large enough to wrap around the entire book, plus 3 inches on all sides. (For fabric, we used Over the Hills in Petal, Bartone in Mint, Manchester in Tiffany, Gridlock in Freesia on White, and Gridlock in Navy on White, all from minted.com.)
- Apply a layer of découpage glue to the front cover of the book box. Position the fabric on the cover so that you have 3 extra inches at each straight edge, then press firmly and smooth out any air bubbles. Paint over that section of fabric with more découpage glue to fully saturate it; let dry.
- Repeat Step 3 with the spine, then the back cover of the box, letting dry after each step. Fold the extra fabric down around the inner edges of the cover, then apply découpage glue the same way; let dry. When the entire box has dried, carefully trim any excess fabric with a craft knife (an adult’s job).
- Add your teacher’s name with letter stickers or stencils. (To stencil: Use a pouncer and do one letter at a time; allow each letter to dry before starting the next one.)

MAGNETIC HEDGEHOG
- Separate the two halves of a papier-mâché egg box (find them at craft stores). To make the base, cut a small oval out of craft foam and hot-glue it to the center of the bottom half (an adult’s job), pressing it firmly to flatten (this will keep the hedgehog from rolling).
- Hot-glue 10 strong magnets (like ProMAG 0.75-inch Flexible Magnets, $8; michaels .com) to the inside of the egg top and along the upper edge of the egg bottom, spaced about ¼ inch apart (an adult’s job). Avoid gluing magnets to the narrower end, where the face will be.
- Paint both halves, including the foam, with craft paint; let dry. Then paint on the hedgehog’s face; let dry.
- Use a craft knife to cut little slits for the eyes and nose (an adult’s job), then push small black brads into the holes; fasten inside.
- Place a zip-top bag filled with rice or beans into the bottom half (this weighs down the hedgehog). Dot the edge with glue and close the egg.

MARBLEIZED TISSUE BOX
Note: Nail polish is permanent and can emit fumes. Wear a smock or old clothes and latex gloves for this project, and make sure you work outside or in a well-ventilated room.
- Spread out plenty of newspaper or a drop cloth on your work surface. Place a strip of duct tape across the top inside opening of an unfinished wooden tissue box. Press it firmly to make it as watertight as possible.
- Fill a bucket or plastic bin (it should be deep enough to dip the entire box) with water, leaving a few inches at the top.
- Choose two to three shades of nail polish. Working very quickly (an adult helper comes in handy), drip color onto the water’s surface (it’s better to use the brush than to pour it). Add enough nail polish to cover the entire surface, varying the colors as you go.
- Wearing latex gloves, hold the box upside down from the inside, and dip it straight into the water, right up to (but not over) the bottom edge. Pull it out quickly, and gently place it right side up on the newspaper or drop cloth to dry, touching the outside as little as possible. Let dry completely.
P.S. If you’re making multiples, clean the water between dips: Drag a piece of cardboard or thick paper across the surface to pick up leftover nail polish.